This article shows you how to check current BIOS version in a Windows 11/10/8.1/8/7 computer.

The BIOS is the software that is built into your computer’s motherboard. Each and every time you press your PC’s power button, the BIOS is the first operation to load your operating system and all of the personal settings that make your computer your own, controls everything from the boot order of your drives to preboot security options to whether the Fn key on your keyboard activates a function key or a media control. Inside the BIOS you can change many basic computer settings, like the boot order, system time and date, or enabled hardware components. That’s why the BIOS (basic input/output system) is also known as “Setup”. When troubleshooting, you might need to check your BIOS version to see if an update is available or you may need to check your BIOS version if you plan to update the BIOS.
How to Check BIOS version
Method 1 : Via Command Prompt
1- Type “command prompt” in the search box. Click on the search result.
2- Type this command “wmic bios get smbiosbiosversion” and hit Enter.
wmic bios get smbiosbiosversion

Now you’ll be able to see the version number of the BIOS that’s in your current PC.
Method 2 : Via System Information
Click on Start, choose Run and type in msinfo32. This will bring up the Windows System information dialog box.
The BIOS version number is displayed on the System Summary pane. Look at the “BIOS Version/Date” field.

Method 3 : Via Windows Registry
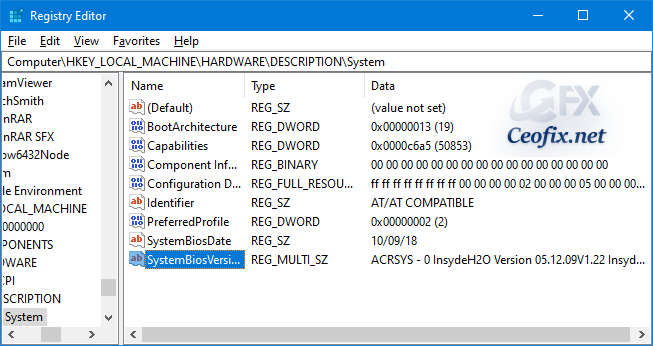
Open Registry and Go to the following key:
HKEY_LOCAL_MACHINE\HARDWARE\DESCRIPTION\System
In right pane locate BIOSVersion value. This value represents your BIOS version.

And you’ll see several keys related to the BIOS, including SystemBiosDate, SystemBiosVersion, VideoBiosDate, and VideoBiosVersion.
Method 4: Via DXDiag
DirectX Diagnostic Tool or DXDiag.exe is basically meant to help you troubleshoot DirectX issues. But if you Run dxdiag to open it, you will see the BIOS version mentioned under the System tab.
Press the Windows Key + R, type in dxdiag and press Enter. You can find the BIOS version for your system on the System tab.

System Information is displayed by default, including your BIOS information.
Method 5: Via PowerShell
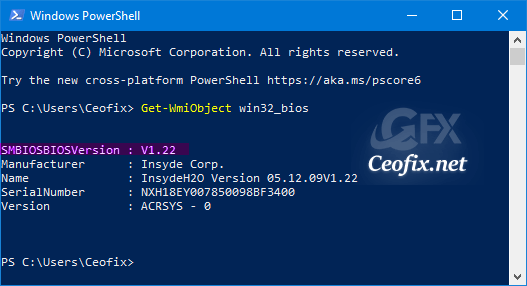
You might prefer to use the Powershell. Open PowerShell.
Enter the following command:
Get-WmiObject win32_bios
and press Enter.

Method 6: Via restarting your computer and entering the BIOS
The manufacturer of your motherboard can choose whatever key it wants you to press, but commonly used keys include Delete, F1, F2, F10, and F12. You can find the right key to press in your motherboard’s manual.

Once inside the BIOS or UEFI, look for an information page. There, you find the version of the BIOS used by your computer’s motherboard.
Method 7 : Via a Third-Party System Information Tool
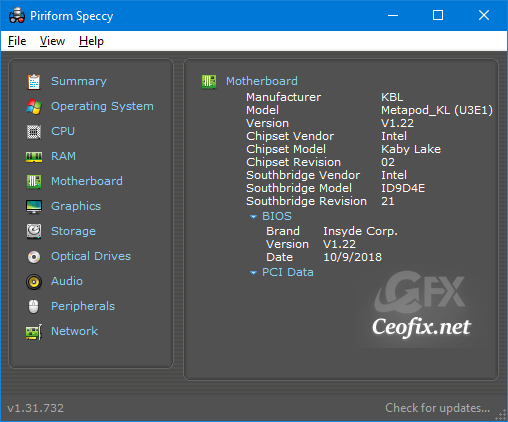
If none of the above methods suit you, you might prefer to use third-party applications that display this information. A good example is Speccy,
1- Download Speccy, a completely free system information tool for Windows.
2- Extract and then run Speccy.exe or Speccy64.exe if you chose the portable version.
3- Wait while Speccy scans your computer. This usually takes several seconds to a few minutes, depending on how fast your computer is.
Choose Motherboard from the menu on the left.

4- Note the Version listed under the BIOS, this is the BIOS version.
Published on:Jun 12, 2020-edited on: 10-04-2023
