The Windows Mobility Center is a lesser-known tool that exists in all modern Windows versions. In this article will show you all possible ways to open Windows Mobility Center in Windows 10.

Windows Mobility Centre is a nice feature for laptops in Windows 10 OS. By default, the Windows Mobility Center Tool is available in Windows PC that runs with a battery, for instance, laptop and tablet. Windows Mobility Center allows the user to change brightness, screen orientation, volume, sync center settings, display projection and presentation settings of the system and Mobility Centre, Depending on your hardware and your computer manufacturer, more or fewer tiles may be shown.

How to open Windows Mobility Center in Windows 10
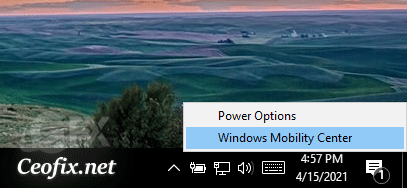
– Open the Windows Mobility Center using the battery icon from the system tray
Right-click on the battery icon present in the system tray of the Taskbar and then click Windows Mobility Center from the pop-up menu.

– Open Windows Mobility Center via Search box
Click the Cortana Search or Search box on your taskbar, type Mobility Center. Then, click the Windows Mobility Center search result.

-Open Windows Mobility Center via Power User Menu
Press the Windows key+X shortcut key to open the Power User Tasks Menu. You will see the Mobility Centre option and then click Mobility Center from the Power User Menu.

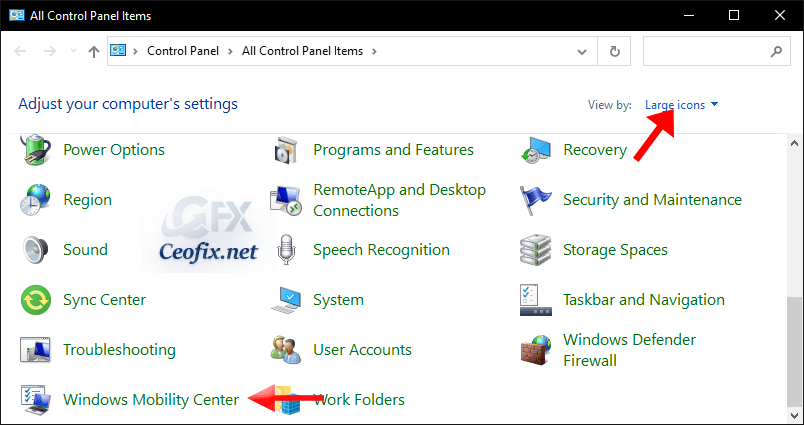
– Open Windows Mobility Center via Control Panel
Open the Control Panel and set View by option to Large icons. You can then click Windows Mobility Center or navigate to the Hardware and Sound section. In it, you should also find a link to the Windows Mobility Center.

-Open Windows Mobility Center via Run or Command Prompt
Press Win+R hotkey or type run in the Search box to open the Run Command box.
Type mblctr and press Enter to launch Windows Mobility Center.

mblctr
-Open Windows Mobility Center via CMD
You can access Windows Mobility Center with the help of command prompt. To start, press “Win + X,” and then select the Command Prompt option or Click the Start button, enter cmd in the search box and tap Command Prompt.
type mblctr and press the Enter button to open Windows Mobility Center.

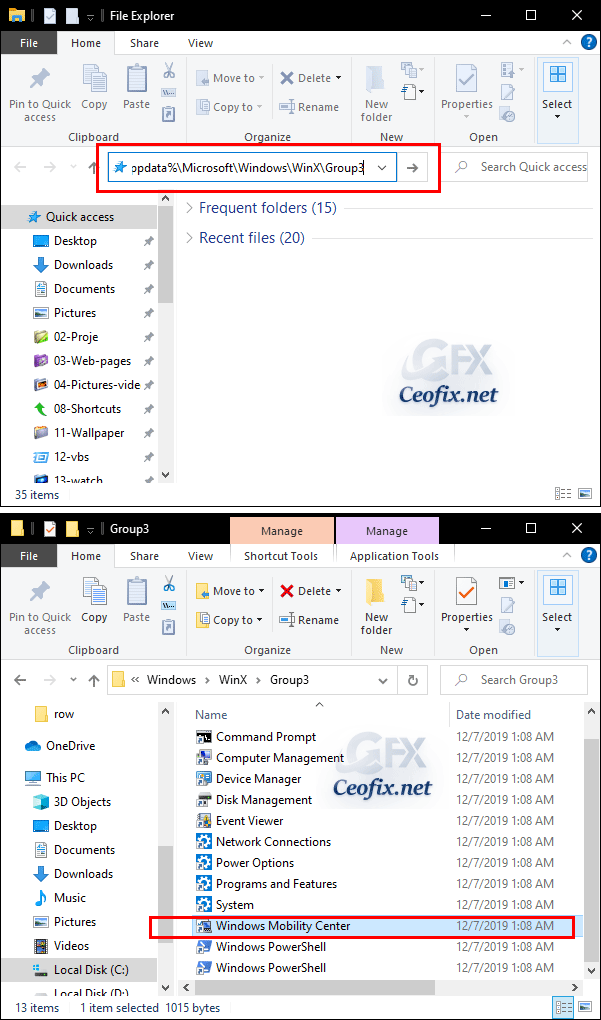
-Open the Windows Mobility Center from Windows File Explorer
Open File Explorer, copy and paste the following path in the address bar and press Enter.
%LocalAppdata%\Microsoft\Windows\WinX\Group3
In the folder, find and double-click on the “Windows Mobility Center” shortcut or copy the shortcut to your desktop.

*Alternatively
-Create a shortcut Windows Mobility Center.
Right-click on your desktop, select New choose and then click Shortcut from the Popup menu.

Copy and paste the location (use mblctr ) below into the location area, and click on the Next button.
mblctr
You need to provide a name to the shortcut that you are creating. So, type Mobility Center or give any name of your choice and click the Finish button.

Recommended For You
How To Create Task View Shortcut in Windows 10 (ceofix.net)
How to Create A Calculator Shortcut on Desktop (ceofix.net)
Create a Battery Saver Shortcut in Windows 10 (ceofix.net)
Create a Desktop Shortcut for File Explorer in Windows 10 (ceofix.net)
Windows 10 Task View Shortcuts (ceofix.net)
How to Create Run Shortcut on Desktop in Windows 10 (ceofix.net)
Create The Windows Settings Shortcut in Windows 10 (ceofix.net)
How To Add Snip & Sketch App Desktop Shortcut in Windows 10 (ceofix.net)
Open Elevated Command Prompt Via Keyboard Shortcut (ceofix.net)
